Photobucket     Photobucket        

Wednesday, November 30, 2011

Share Your Creations Party # 14

Welcome to Share Your Creations party #14! Last weeks party was a little slow due to Thanksgiving, but I hope you will join this week! I'm sure you have some Christmas decorating you would like to share. We are ready to see it!!


Share Your Creations


On with the features...


I loved this idea from Scribbles and Swirls...she painted a frame and hung ornaments in the middle. Super cute! I have seen this done on Pintrest too.

What a pretty vignette! Check out Ditto Decorating for more pics.


This is so neat! I love what The Project Queen did with the Victrola...check out her blog for the before pics.

Great projects! Keep them coming....

Since everyone is loving the mesh I thought I would show you a Santa wreath I recently made. It's fun and whimsical! For my tutorial click HERE.


Remember, if you make a mesh wreath send me a pic and I will post it on my blog.


I will have more of my house to show you soon. I am in the process of doing a million things right now! Whew! I should have everything done in a few days....


What did you create?


Add Your Link...


Monday, November 28, 2011

My Christmas Mantle

It's almost December! I'm sure you are all decorating by now. I feel like I have been decorating forever and it's not over yet! lol...All I have done in my house is the tree and mantle. I have been cleaning for the past two days...whew! It feels good to get it done!


I ended up doing this mantle totally different than last year. However, I did keep the jars with the glittery sticks and balls. I just reworked them and added the Mark Roberts fairies. I found the tree print at Kirkland's this weekend and loved it! I already had the frame, however, the print did not fit inside of it. Let's just say I made it work...it is my little secret! lol...When I am determined to do something I will find a way to do it! After I added the print to the mantle I started my garland. I used ornaments, ribbons, and narrow mesh to give it lots of pizazz! If you are wondering how the garland is attached I used three tiny nails on the top back of the mantle, one on each side and one in the middle. Next, I wrapped the greenery around the nails to secure it. (A flathead nail works the best) I know alot of people don't want to use nails on their mantle which is understandable. Another thing you can try is command hooks. I just watched a commercial for those and it looks like they might work well. After the garland was done I added the jars with the glittery sticks and balls. Next, I added two different sizes of glittery trees. It was just by chance that I had those trees and they worked well with the picture. Last, I added some little presents under the tree picture. This mantle really sparkles when you walk in the front door! It is full of glitter!


Sparkle Sparkle!

The ornaments, ribbon and red curly sticks all came from Hobby Lobby and Michael's. Alot of you have asked me where the green mesh came from and I think it was Kirkland's last year, although, I could have picked it up in Dallas. When I was in Kirkland's this weekend they did have some similar, but they were all out. They were just using pieces to decorate with.


I found the jars at Hobby Lobby last year and added the glitter balls.

I bought the green spiral tree at Michael's the other day. I think I bought the red and green trees in Dallas. There are some similar at Pier 1 Imports if you are interested.


That's the mantle! Now I am starting on the rest of the living room and kitchen. I still have a few houses to decorate this week, so I will have to work on mine in between.


Have a great Tuesday!!


Joining Kim at Savvy Southern Style for Wow Us Wednesday and Rhonda at Southern Hospitality for Merry Mantles.


Saturday, November 26, 2011

Decorating A Christmas Tree With Mesh Ribbon Tutorial

I hope you are all having a wonderful weekend! I have been busy cleaning and decorating today. Since I have been so busy with houses and custom orders lately my house has taken a back seat! It's time for a good cleaning for sure, but decorating is more fun!


I decided to do this tutorial when alot of you asked me how to add mesh to a Christmas tree. Several of you commented on the whimsical tree I decorated with the green mesh and wondered how the mesh was added. I know there are several ways to add the mesh, I will show you the easiest way I have found to do it.


First, I have to show you how my tree looked when we got it down from the attic. Doesn't it look wonderful?? LOL! I can't believe I just left everything on it...What was I thinking? I think I just wanted to get it up and out of the house...and look how many lights were out! I had to make a quick to trip to Wal-Mart for sure. I restrung the new lights and it was ready to decorate!


When adding the mesh to your tree, the first thing you want to do is scrunch. It is very wide and a little hard to work with, but you will get the hang of it.


Wrap a branch around the part you scrunch starting at the bottom back of the tree. I always start at the bottom, but you can also start at the top and work your way down. There is no wrong or right way to do it. Liz at Savvy Seasons and Sheila at Notesongs spiraled their mesh down the tree. It looks beautiful that way too.


Make a poof about 12 to 16 inches and scrunch again wrapping a branch around it.


Scrunch and wrap all around the tree.


until it looks like this...You can add the mesh closer together if you would like. I used just a little over one roll.


I hope that was easy to understand.


You can also add the smaller mesh the same way if you would like. I didn't have very much of the green, so I cut it and wrapped a branch around it for a few poofs. I love the way it curls!
(Kevin just asked me what a poof was...lol. I just assumed you guys know)


Now you are ready to add your ornaments. It's hard to see in this pic, but I always start with the inside of the tree adding the larger (cheaper)ornaments first. The glittered balls are great for adding some sparkly depth.


Now your ready to add your favorite ornaments! I always pick out the ones I like best and add them to the front of the tree.


As you can see I have a little bit of everything on my tree. I usually try to buy a few ornaments every year. I guess I'm really into Santas and snowmen the most.


After you are done adding all of your ornaments you might want to add some things coming out of the tree to add more depth and interest. I added glittered berries, stars, glittered light bulbs, etc. Whatever I could find! lol...


Now it looks really full!


It's time for the topper! I made two bows out of five different ribbons...oh my! Seriously? Five? As I have said before, I am a ribbon freak! I actually made the bows out of three ribbons then added some pieces of two more ribbons to the top of the bows.


For my bow and tree topper tutorial click HERE.


I wired the two bows back to back on the top of the tree letting the streamers hang down. I tucked the streamers into the tree. The streamers were about 40 inches long.


Now it's time for the fun stuff!


I added the glittery balls and stars all around the top of the bows. Sometimes it's hard to find a spot, but you just have to keep poking.


It turned out fun and whimsical!
That's all there is to it!


I hope you enjoyed my tree decorating tutorial! Let me know if you have any questions or if I have left anything out.


Thanks again for your nice comments on my Christmas decorating! It won't be long before things slow down a little and I can visit my favorite blogs again. I am hoping to get the rest of my Christmas decor up over the next two days. I finished the mantle last night...I will show it to you soon!


Have a wonderful Sunday!


Thursday, November 24, 2011

Big And Beautiful!

I hope you all had a wonderful Thanksgiving! We had a great time visiting with family. I ate way too much as usual and my stomach is still bloated! lol...After we ate and visited I headed to Michael's for the awesome sale they were having. Later on, Kevin, Chase and I went to Wal-mart and were among the crazy people! lol...People were like sharks at a feeding frenzy and Kevin was right there with them! Oh my! He ended up getting a game for Chase that he really wanted so I guess it was worth it. =0


I have been anxious to show you my friend's beautiful home that Sherry and I have been decorating over the last three days. It didn't take three full days...we worked on others in between. However, it is always a big job! This year it took a little longer due to most of the lights going out and a huge wreath falling off of the balcony. Ok...that was probably my fault, but I'll blame it on Sherry. Ha! Who knew two little thin wires wouldn't hold a fifty lb wreath? =o


My friend has two Portuguese water dogs named Emma and Bo. They are the cutest and funniest dogs I've ever seen. Bo can even open the door to go outside and shut it when he comes in! I'm not kidding! He is amazing!


I had to get a picture of them, so I put bows around their necks and they posed just perfect for me!


This home is big and beautiful! I am always glad when it's done and love to just step back and look at it's beauty.
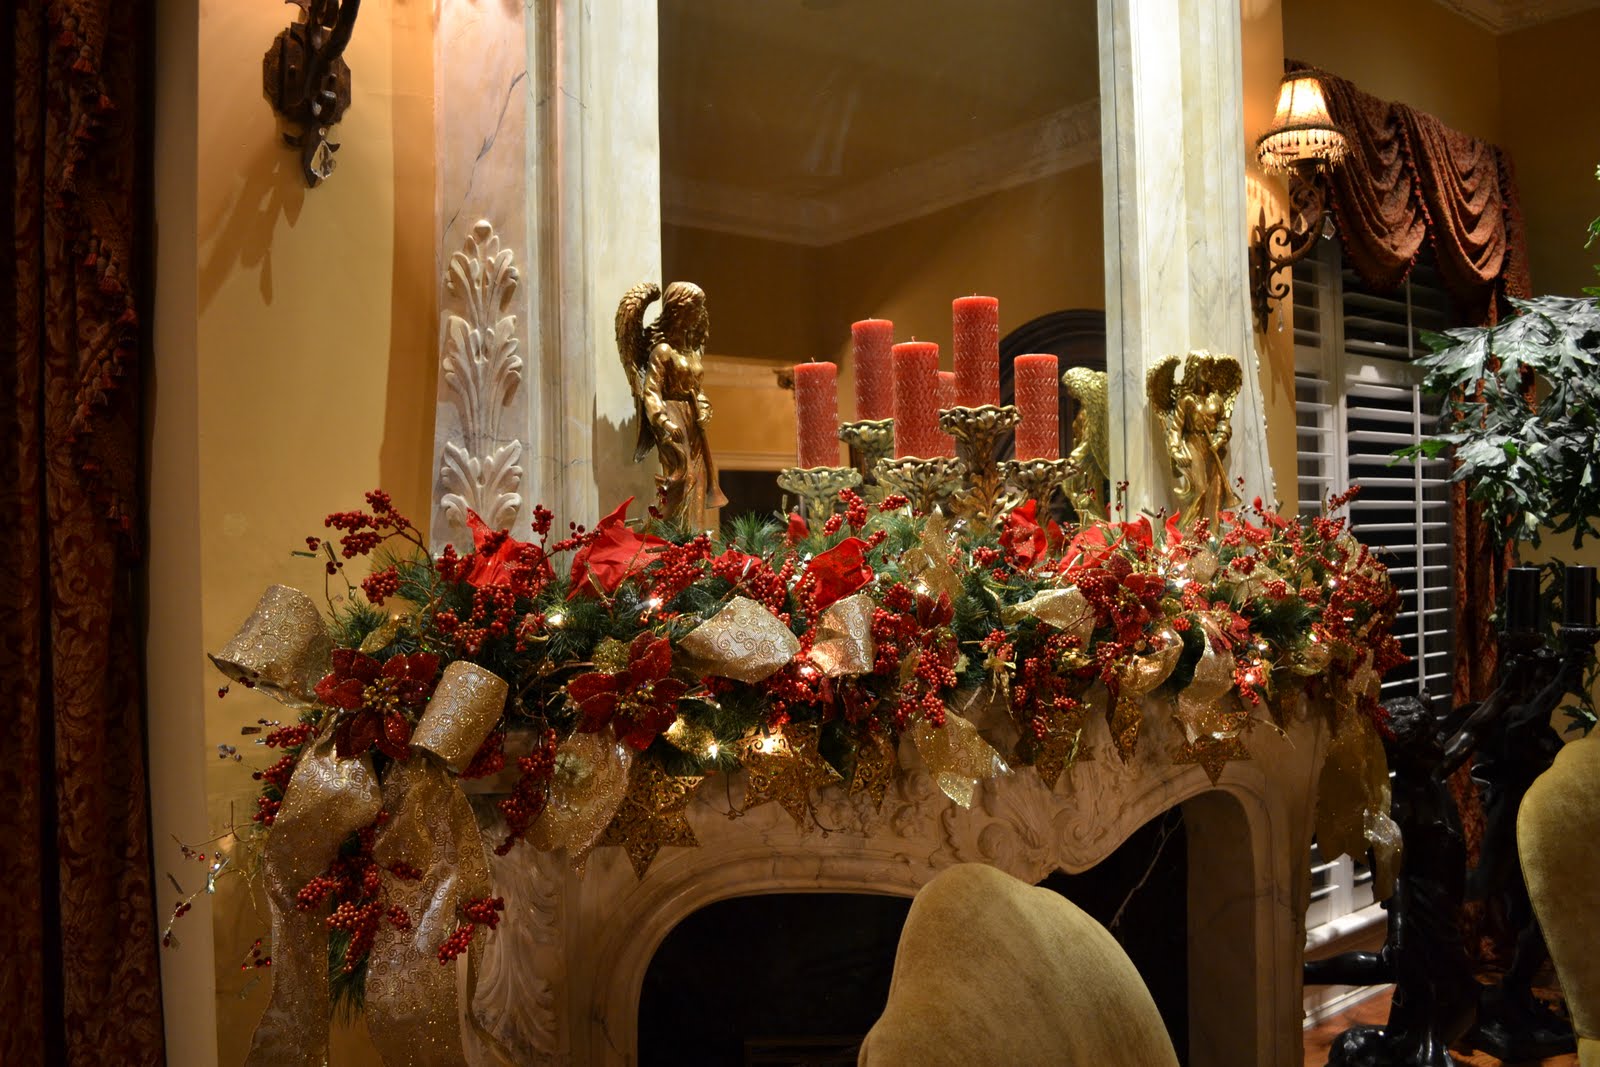
This is a big room and needed something massive on the mantle. I designed the mantle piece along with Sherry a few years ago and it still looks as beautiful as ever.


It is full of glittered poinsettias, ribbon, berries and star ornaments that hang from the garland. We added angels on each side and a candle holder in the middle.

So elegant...


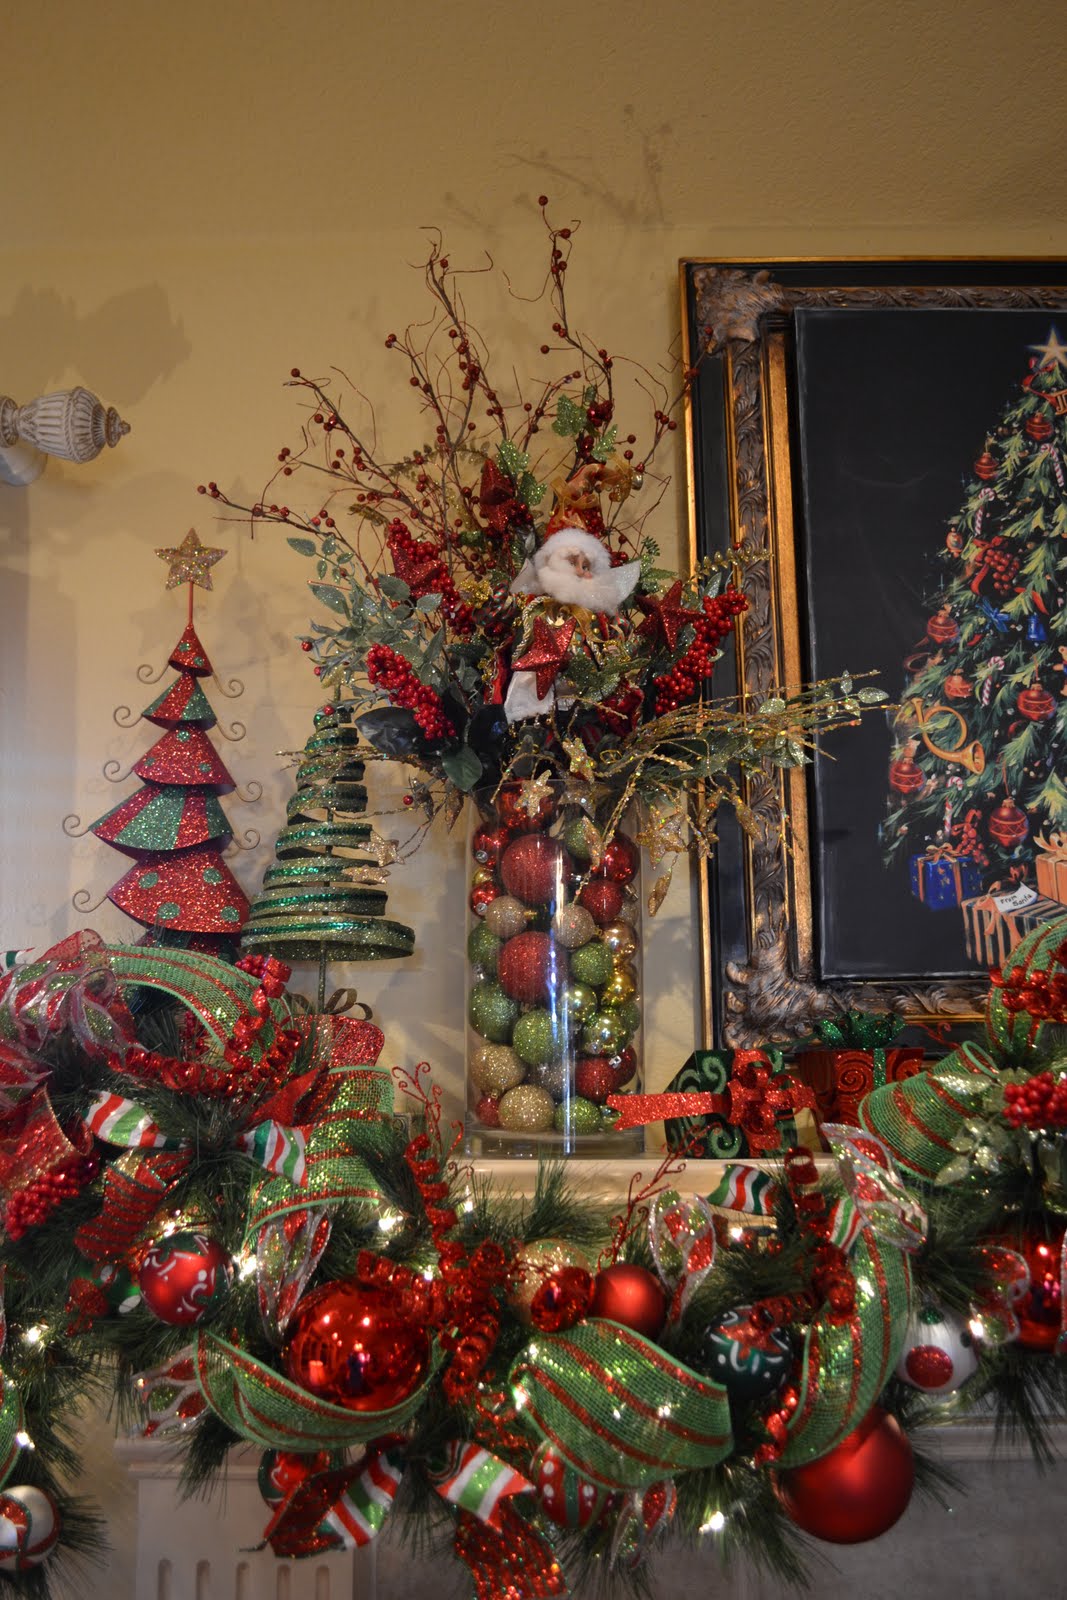
Here is the tree in the same room. It is full of beautiful ornaments, berries and ribbons. Love the Santa fairy!


I redid the garland on her staircase last year adding new ribbons, poinsettias and berries. It turned out beautiful and was easy to put back up. It just needed some fluffing!


I showed you her tree in the family room the other day.


Here is the mantle...I spy some little elves!


Love the glass beads hanging down.


I wish I could have gotten more pictures of the kitchen, but she was in the middle of cooking for Thanksgiving. I'll have to go back and get more pics soon. I love her Santa bakers! These are Mark Roberts pieces in case you are wondering.


Here is the outside of the house all lit up! Do you see that wreath on the balcony? Yip, that's the one that fell.


I took this picture of the outside of her door in the daytime. Love the red and gold and big ornaments hanging down. Sherry and I redid this garland last year too.


I hope you enjoyed the pictures of this beautiful house!


I still have more houses to go! I have a little break until next Tuesday, so I will be working on mine. I will be posting my tree tutorial tomorrow or Saturday. I hate to say tomorrow because I am going shopping and might get caught up in the crowds! lol...I will definitely be doing my house on Saturday and Sunday for sure! I am ready to get it up.


Feel free to join my Share Your Creations party on the post below. I would love to see all of the Christmas decorating you are doing!


Have a wonderful weekend!


Featured in Country Woman Magazine fall 2012 for kitchen and crafts


My photo
I'm a 42yr. old mother of 1. I've been married for 21years to a wonderful man, Kevin. We have one son together named Chase who is 14. We live in a small town in Arkansas and have a dog named Sassy, a cat named Coco and now a chinchilla, Tiki. My husband is a Database Administrator and I have my own business called Kristen's Creations where I make and sell a variety of crafts. I worked in a shop as a floral designer for 15 yrs. until it closed. My former boss decided to retire and lease out her building. I enjoy crafting, decorating, and hanging out with my family. E-mail me at Kristenscreations@hotmail.com

Follow me on Instagram!

https://www.instagram.com/kristenscreations12/

You are welcome to pin anything from my blog

Follow Me on Pinterest

Total Pageviews


The tip junkie featured my snowman mesh wreath!

homemade crafts

Popular Posts

BlogCatalog

Decorating Blogs - BlogCatalog Blog Directory

Sassy Girl

Sassy Girl

Cock a doodle doo!!

Cock a doodle doo!!

Wish we were here!

Wish we were here!


Blog List

  • [image: Away Suitcase with Tiffany & Co. Tote]Welcome to the 790th Metamorphosis Monday! Do you have any big travel plans coming up this spring or summer? ...
    13 hours ago
  • My mom and I started talking about the IOP shell collection contest of 2022 before we even found our first shell this year. Once the competition was men...
    1 day ago
  • [image: How To Make $1 Dollar Store Flowers Look Expensive.] I like to have pretty floral arrangements around the house, but sometimes that can get expen...
    1 day ago
  • Another spring is here and that means I get out my spring decor and add some touches around my house. I don't go out and buy all new things, I just pull ...
    1 day ago
  • Spring and Easter Inspiration. The best Easter ideas, including egg decorating, recipes, tablescapes, basket ideas, and last-minute touches, to make your...
    2 days ago
  • [image: CONFESSIONS OF A PLATE ADDICT 6 Ways to Decorate with Eggs2]I don’t know about you, but I am starting to think about Easter since it’s only a few w...
    2 days ago
  • This is the favorite pasta dish requested in my house, I make it once a week for my men, both Matt and my son love this sauce so much! It’s based on the “M...
    3 days ago
  • How to paint furniture the easy way...no sanding needed! You do *not *have to sand furniture before painting. If your piece is in good condition, this me...
    4 days ago
  • After learning of King Charles’ recent cancer diagnosis, people are understandably speculating about the royal family’s future. Queen Camilla, Prin...
    1 week ago
  • *Welcome to our 38th edition * *of Tales of The Traveling Tote, * *where our MacKenzie-Childs * *totes take you to all kinds of * *places and on all kinds ...
    2 weeks ago
  • You first thought probably is: what is it special about vanilla ice cream, come on! Don’t you have anything better... The post Vanilla Ice Cream (Dua Lip...
    3 weeks ago
  • If you have the driveway space, it is fast and easy to make your very own driveway pickleball court. All you need is the concrete/asphalt space, a portab...
    2 months ago
  • Of all the major appliances in your home, your HVAC system is by far the most important. This system is ... Read more
    6 months ago
  • [image: Finally!! Capard House] Grab a hot cup of Irish tea!!! It’s a long one. FROM VERANDA: Capard House In 2017, I wrote a story abou...
    6 months ago
  • WELCOME, friends! It's been a long time! Before Fall arrives, I'm sharing my Summer Home Tour over on my Youtube channel! If you'd like to watch, come ...
    1 year ago
  • When we first had babies, one of my dreams was that when they each turned 13 - I wanted to take them on a special trip - just them and Scott and I. I wa...
    2 years ago
  • Hey guys. I just had to take a few minutes to post because I just cannot let what happened today go by without sharing. Sometimes the gardening com...
    2 years ago
  • [image: Instant Pot Chicken and Wild Rice Stew - Make this yummy stew start to finish in under 30 minutes using the Instant Pot. virginiasweetpea.com] Happ...
    2 years ago
  • Perhaps the only thing I like better than plaid is tartan plaid. There is just something about it in classic Christmas colors that has me swooning over i...
    2 years ago
  • 2 years ago
  • Hello, Dear Ones. It is with a sad heart that I come to you today to say I am no longer going to post on my blog. I have tried a few times in the past to...
    3 years ago
  • The sun room has gone through a couple of changes again with a new jute rug and a colorful textured ottoman that I just love. Oh, and some color has retur...
    3 years ago
  • Goldfish Valentine's Day Printable from One Crafty Place I will be the first to admit that Valentines is all about the sugar in our house. This year my...
    4 years ago
  • Good morning! Today I am sharing our mantle and hearth, decorated for Christmas. Come on in. I wish you could actually come visit! At dusk I light all the ...
    4 years ago
  • Hi friends, After my last post, seems as though we have made some progress. So much in fact, Madison was able to have a seat in her very first class today....
    4 years ago
  • It’s been awhile and a lot has happened in my life. For those of you who want to catch up with me please feel free to follow me on Facebook to catch up. Yo...
    4 years ago
  • I am writing today to say farewell to blogging. I have loved this blog. I started *The Shabby Nest* in 2008, and it has been a source of joy, it has prov...
    4 years ago
  • There's a hodge podge of Valentine love on our mantel. Read more » About the Author: Grandmother of 6, Laurie's favorite places to shop are estate sales,...
    5 years ago
  • Dear Readers, The time has come for me to say good-bye to Poofing the Pillows. I have loved writing this blog for 10+ years but I know it's time to move ...
    5 years ago
  • 5 years ago
  • Note: If you are looking for Foodie Friday and Everything Else, the link party has been permanently retired. Thanks for all of your support over the years...
    6 years ago
  • So, my husband and I are attending a banquet this week and I realized that I don’t really have anything that qualifies as ‘cocktail party’ attire. So, ye...
    6 years ago
  • The first day of fall, where has the summer gone to? We've been in the upper 90's all week, hard to believe fall is here and yes those cold days of winter ...
    6 years ago
  • Have you seen or should I say drooled over all the blogs showing their flocked christmas trees? Well, I can say I drooled...just a bit over them! So much t...
    7 years ago
  • Hello, and Happy Valentine’s Day! I thought I’d share a couple of the Valentine’s I’ve made for my oldest granddaughter (the 5 year old). I used a couple...
    8 years ago
  • Hi there friends... Welcome back to this weeks Share Your Style Party!! ~~~~~ Our host this week is Kelly from The Essence of Home! Take it away Kelly! ...
    8 years ago
  • These closet doors are dreamy!!! *Dream Book Design *turned an unattractive closet door into something I want!!! Learn *how to build a barn door for a...
    8 years ago
  • This Miniature Pewter-Like Teapot with Lid that lifts and tilts is adorable at the height of just 1 1/2 inches tall, and matching teacup, saucer, and disp...
    9 years ago
  • *Hi! I have been decorating for Christmas this week and finished the piano so I wanted to share.This will be a short post, I am working hard to get my hous...
    9 years ago
  • I have been keeping a secret for a few months... and it has been hard not to give it away! Thank goodness I can finally tell you today!!! After 4 1/2 y...
    9 years ago
  • Hello Lovlies, You are cordially invited to join me at my new blog, Larkspur Interiors. WHEN: Now! WHERE: www.larkspurinteriors.com R.S.V.P.: Not necessa...
    10 years ago
  • It's Friday once again. Can you believe it? And it's time for another great house tour. Today we're snooping around Jenna's home at Rain On A Tin Roof. ...
    10 years ago
  • Projects, projects, do they ever end? lol There is always something to add to the list, isn't there? I had wanted to add bead board to the ends of our...
    11 years ago